Flexible Address Formating
Sometimes the seeded address fields are not sufficient to capture all the address details of customers in different parts of the world. Oracle gives us an option of creating custom address fields for our requirements.
Flexible Address Formatting
Flexible
address formatting allows you to adapt the address style based upon the country
with
which
an address is associated.
There
are two options when using flexible address formats:
•
Use Predefined Format
•
Customize Address Format
Oracle
Applications provides seven predefined address styles or formats: Default,
Japanese,
Northern
European, Southern European, South American, United Kingdom/Asia/Australasia,
and
United States. See: Address Style Mappings, Oracle Receivables Implementation Guide
for
information about these formats
Note: Predefined address styles are not by default associated with a
specific country.
To customize address formats:
Step 1: Set Up Flexible Address
Format
As
the address formats are designed in a descriptive flexfield, we will use this
functionality to
add
to the list of available formats. There are several descriptive flexfields that
must be
updated with a
new context-sensitive segment to increase the address format options. They are:
Descriptive
Flexfield Displayed
Bank
Address Banks
Remit
Address Remit-to Address, Customers
Payment
Address Payment Summary, Payment Overview
Site
Address Suppliers
After
creating a context field value, associate segments appropriate to your new
address
format.
Remember to freeze and compile the flexfield.
See:
Defining Descriptive Flexfields, Oracle
Applications Flexfields Guide for
more
information
about creating context sensitive descriptive flexfields.
Step 2: Create Address Style Lookup
After
you have created a new context field value, map the context field value name to
a new
lookup
code. Navigate to the Special Lookups window using the Application Developer
responsibility.
Enter the following values:
•
Language
•
Code: This must match the context field value you created in Step 1.
•
Meaning: This should be the description you gave the context field value in
Step 1
Do
not use start or end dates for this lookup.
Step 3: Assign Style to Country
It
is necessary to associate the style you created in Step 2 with a country on the
Countries and
Territories
window. You must do this step for all countries you wish to have associated
with a
flexible
address format, either custom defined or delivered by Oracle.
See:
Setting Up Flexible Addresses, Oracle
Receivables Implementation Guide for
more
information
about flexible address formats.
How to create Custom Address Styles in Oracle Apps
Client – Clients who are having Global Rollouts and need for multiple address styles.
Business Case – Need to add country specific address style formats for addresses information which are stored in the different core modules of Oracle Apps including Receivables (for Customer and Remit to Addresses), Payables (Supplier and Payment Addresses), Banks (Bank Branch addresses)
Out of the box address styles - Oracle Applications provides one default and five predefined address styles. These address styles cover the basic entry requirements of many countries. The different address styles provided out of the box are:
• Default,
• Japanese,
• Northern European and Southern European,
• South American,
• United Kingdom/Asia/Australasia,
• United States
How to add a new Address Style -
Let us say the client has a Business requirement to add a new address style for ‘Canada’. The following high level steps can be followed to define this new ‘Canada’ address style.
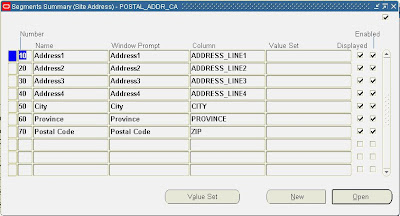
1. Choose address style database columns for your ‘Canada’ address style.
First you need to decide (as per client’s requirements) which columns from the database you are going to use and how you are going to order them. All the seeded address styles include the following database columns and some additional columns.
• Bank Addresses
• AP_BANK_BRANCHES.ADDRESS_LINE1
• AP_BANK_BRANCHES.CITY
• AP_BANK_BRANCHES.STATE
• AP_BANK_BRANCHES.ZIP
• Customer and Remit-To Addresses
• HZ_LOCATIONS.ADDRESS1
• HZ_LOCATIONS.CITY
• HZ_LOCATIONS.POSTAL_CODE
• HZ_LOCATIONS.STATE
• Supplier Addresses• PO_VENDOR_SITES.ADDRESS_LINE1
• PO_VENDOR_SITES.CITY
• PO_VENDOR_SITES.STATE
• PO_VENDOR_SITES.ZIP
• Payment Addresses
• AP_CHECKS.ADDRESS_LINE1
• AP_CHECKS.CITY
• AP_CHECKS.STATE
• AP_CHECKS.ZIP
For example, in the Japanese address style, the address element called Province maps onto the STATE database column and that in the United Kingdom/Africa/Australasia address style the address element called County also maps onto the STATE database column. Oracle recommends that all custom address styles also include at least the above database columns because these address columns are used extensively throughout Oracle for printing and displaying.
Note: Most reports do not display the PROVINCE, COUNTY, or ADDRESS4/ADDRESS_LINE4 database columns for addresses.
The following screenshot gives you an idea of how to setup database columns for your ‘Canada’ address style:
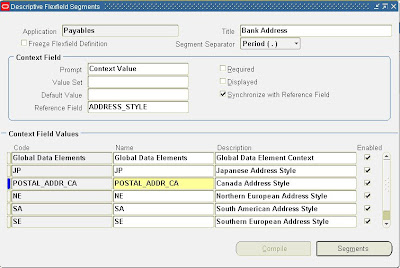
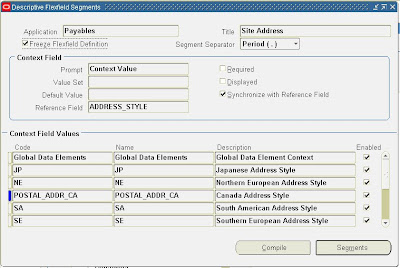
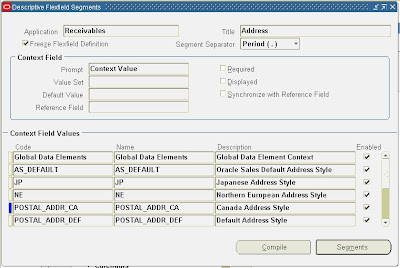
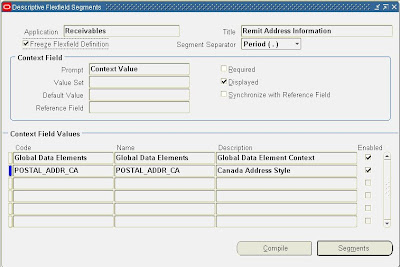
2. Define ’Canada’ address style to database columns using Define Descriptive Flexfield Segments Window.
Next step is to create a new context value for each of the descriptive flexfields.
Payables – Bank Address:
Payables – Site Address:
Receivables – Address:
Receivables - Remit Address Information:
3. Add address style to the address style lookup:
Add the ‘Canada’ address style name to the Address Style Special lookup so that you will be able to assign the style to countries and territories.
To add a new style to the address style lookup:
A. Using the Application Developer responsibility, navigate to Applications > Lookups > Application Object Library.
B. Query the ADDRESS_STYLE lookup.
Receivables displays all of the address styles used by Flexible Addresses.
C. Add your new ‘Canada’ address style, as follows:
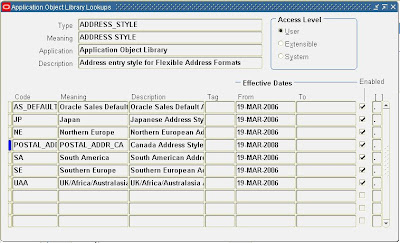
D. Enable this style by checking the Enabled check box.
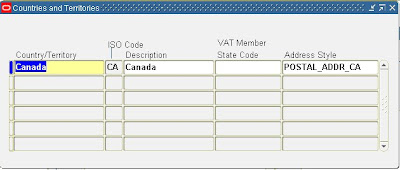
4. Assign the address style to the appropriate country using the Countries and Territories window.
· Using Receivable or Payables Superuser responsibility navigate to Setup > System > Countries. · Query for Country = ‘Canada’
· Attach the ‘Canada’ Address Style created to the Canada Country
· Save the record
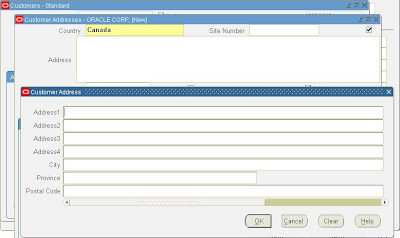
5. This completes the setup for the new ‘Canada’ address style, now you can use this new address style while adding new Canada Customers, Suppliers etc. See screenshot below on how the Customer Form displays the new ‘Canada’ address style:
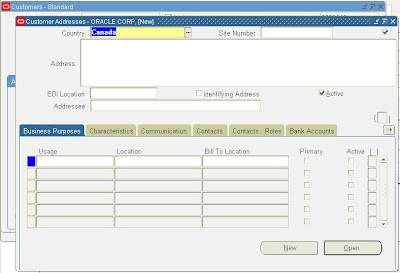
Click on the Address filed and you will get a popup window with the new ‘Canada’ address style:
Business Case – Need to add country specific address style formats for addresses information which are stored in the different core modules of Oracle Apps including Receivables (for Customer and Remit to Addresses), Payables (Supplier and Payment Addresses), Banks (Bank Branch addresses)
Out of the box address styles - Oracle Applications provides one default and five predefined address styles. These address styles cover the basic entry requirements of many countries. The different address styles provided out of the box are:
• Default,
• Japanese,
• Northern European and Southern European,
• South American,
• United Kingdom/Asia/Australasia,
• United States
How to add a new Address Style -
Let us say the client has a Business requirement to add a new address style for ‘Canada’. The following high level steps can be followed to define this new ‘Canada’ address style.
1. Choose address style database columns for your ‘Canada’ address style.
First you need to decide (as per client’s requirements) which columns from the database you are going to use and how you are going to order them. All the seeded address styles include the following database columns and some additional columns.
• Bank Addresses
• AP_BANK_BRANCHES.ADDRESS_LINE1
• AP_BANK_BRANCHES.CITY
• AP_BANK_BRANCHES.STATE
• AP_BANK_BRANCHES.ZIP
• Customer and Remit-To Addresses
• HZ_LOCATIONS.ADDRESS1
• HZ_LOCATIONS.CITY
• HZ_LOCATIONS.POSTAL_CODE
• HZ_LOCATIONS.STATE
• Supplier Addresses• PO_VENDOR_SITES.ADDRESS_LINE1
• PO_VENDOR_SITES.CITY
• PO_VENDOR_SITES.STATE
• PO_VENDOR_SITES.ZIP
• Payment Addresses
• AP_CHECKS.ADDRESS_LINE1
• AP_CHECKS.CITY
• AP_CHECKS.STATE
• AP_CHECKS.ZIP
For example, in the Japanese address style, the address element called Province maps onto the STATE database column and that in the United Kingdom/Africa/Australasia address style the address element called County also maps onto the STATE database column. Oracle recommends that all custom address styles also include at least the above database columns because these address columns are used extensively throughout Oracle for printing and displaying.
Note: Most reports do not display the PROVINCE, COUNTY, or ADDRESS4/ADDRESS_LINE4 database columns for addresses.
The following screenshot gives you an idea of how to setup database columns for your ‘Canada’ address style:

2. Define ’Canada’ address style to database columns using Define Descriptive Flexfield Segments Window.
Next step is to create a new context value for each of the descriptive flexfields.
Payables – Bank Address:

Payables – Site Address:

Receivables – Address:

Receivables - Remit Address Information:

3. Add address style to the address style lookup:
Add the ‘Canada’ address style name to the Address Style Special lookup so that you will be able to assign the style to countries and territories.
To add a new style to the address style lookup:
A. Using the Application Developer responsibility, navigate to Applications > Lookups > Application Object Library.
B. Query the ADDRESS_STYLE lookup.
Receivables displays all of the address styles used by Flexible Addresses.
C. Add your new ‘Canada’ address style, as follows:

D. Enable this style by checking the Enabled check box.
4. Assign the address style to the appropriate country using the Countries and Territories window.
· Using Receivable or Payables Superuser responsibility navigate to Setup > System > Countries. · Query for Country = ‘Canada’
· Attach the ‘Canada’ Address Style created to the Canada Country
· Save the record

5. This completes the setup for the new ‘Canada’ address style, now you can use this new address style while adding new Canada Customers, Suppliers etc. See screenshot below on how the Customer Form displays the new ‘Canada’ address style:

Click on the Address filed and you will get a popup window with the new ‘Canada’ address style:


Comments
Post a Comment